StoreKit to Glassfy Migration
Migrating from StoreKit to Glassfy SDK: A Step-by-Step Guide from the Glassfy team to make the process nice and easy!
For years, StoreKit 2, along with certain APIs of StoreKit 1, has been the trusted choice for seamlessly integrating in-app purchases on iOS/macOS applications. However, developers now have an exciting alternative that offers a range of enhanced features and increased flexibility - the Glassfy SDK.
In this blog, we delve into the process of smoothly transitioning from StoreKit to Glassfy SDK implementation. We will guide you through the necessary steps, accompanied by our invaluable starter project AnchorFocus, to ensure a seamless migration experience.
As you go along, feel free to pull up our video guide on youtube on another screen:
Understanding AnchorFocus StoreKit 2 Implementation
The AnchorFocus app helps people to manage their time using Pomodoro technique and offers a monthly and yearly premium subscription with the help of StoreKit Framework. The purpose of this blog is not to make you understand the basics of StoreKit implementation so we'll skim through the StoreKit implementation part real quick and get to the migration process to Glassfy SDK right after. In this application, you'll find 2 SwiftUI Views and 1 Purchase manager class. The purpose of having these views is as follows :
-
Content View :
This is the primary view of the application, it has the pomodoro clock view that lets you set and reset the timer. The clock lets you set a custom timer and gives you the notification when the time is up. -
Paywall View :
This view presents the offering of your app, all the subscription options/products you are offering are showcased in this view with the help of SwiftUI Views.
import SwiftUI
import StoreKit

struct PaywallView: View {

    @EnvironmentObject private var purchaseManager: PurchaseManager

    @State private var products: [Product] = []

    var body: some View {
        VStack(spacing: 20) {
            if purchaseManager.hasUnlockedPro {
                Text("Thank you for purchasing pro!")
            } else {
                Text("Products")
                ForEach(purchaseManager.products) { product in
                    Button {
                        Task {
                            do {
                                try await purchaseManager.purchase(product)
                            } catch {
                                print(error)
                            }
                        }
                    } label: {
                        Text("\(product.displayPrice) - \(product.displayName)")
                            .foregroundColor(.white)
                            .padding()
                            .background(.blue)
                            .clipShape(Capsule())
                    }
                }
            }
        }.task {
            Task {
                do {
                    try await purchaseManager.loadProducts()
                } catch {
                    print(error)
                }
            }
        }
    }
}
In the above code snippet, we first call the loadProducts() method present in Purchase Manager class and then we iterate through the products array which appends all the products in itself as a response to the loadProducts() method call. Each product is a Button View present on the Paywall View that has a tapped button action. The action to each product directly calls the purchase() method.
Migrating AnchorFocus to Glassfy SDK
There are two ways in which the Glassfy SDK can be implemented;
-
Watcher Mode : In Watcher mode, you'll be able to keep using StoreKit Framework for in-app subscription functioning and additionally you'll be able to use Glassfy Metrics, Dashboard and Functions that will help in the advancement of your in-app purchase infrastructure.
-
Active Mode : In Active mode, you'll get everything that Watcher mode offers and additionally you'll be required to completely move your codebase to Glassfy SDK APIs. This is a pretty neat process and you'll eventually get to offload the boilerplate code.
Now that you know the ways in which Glassfy can be integrated let's start the integration step by step.
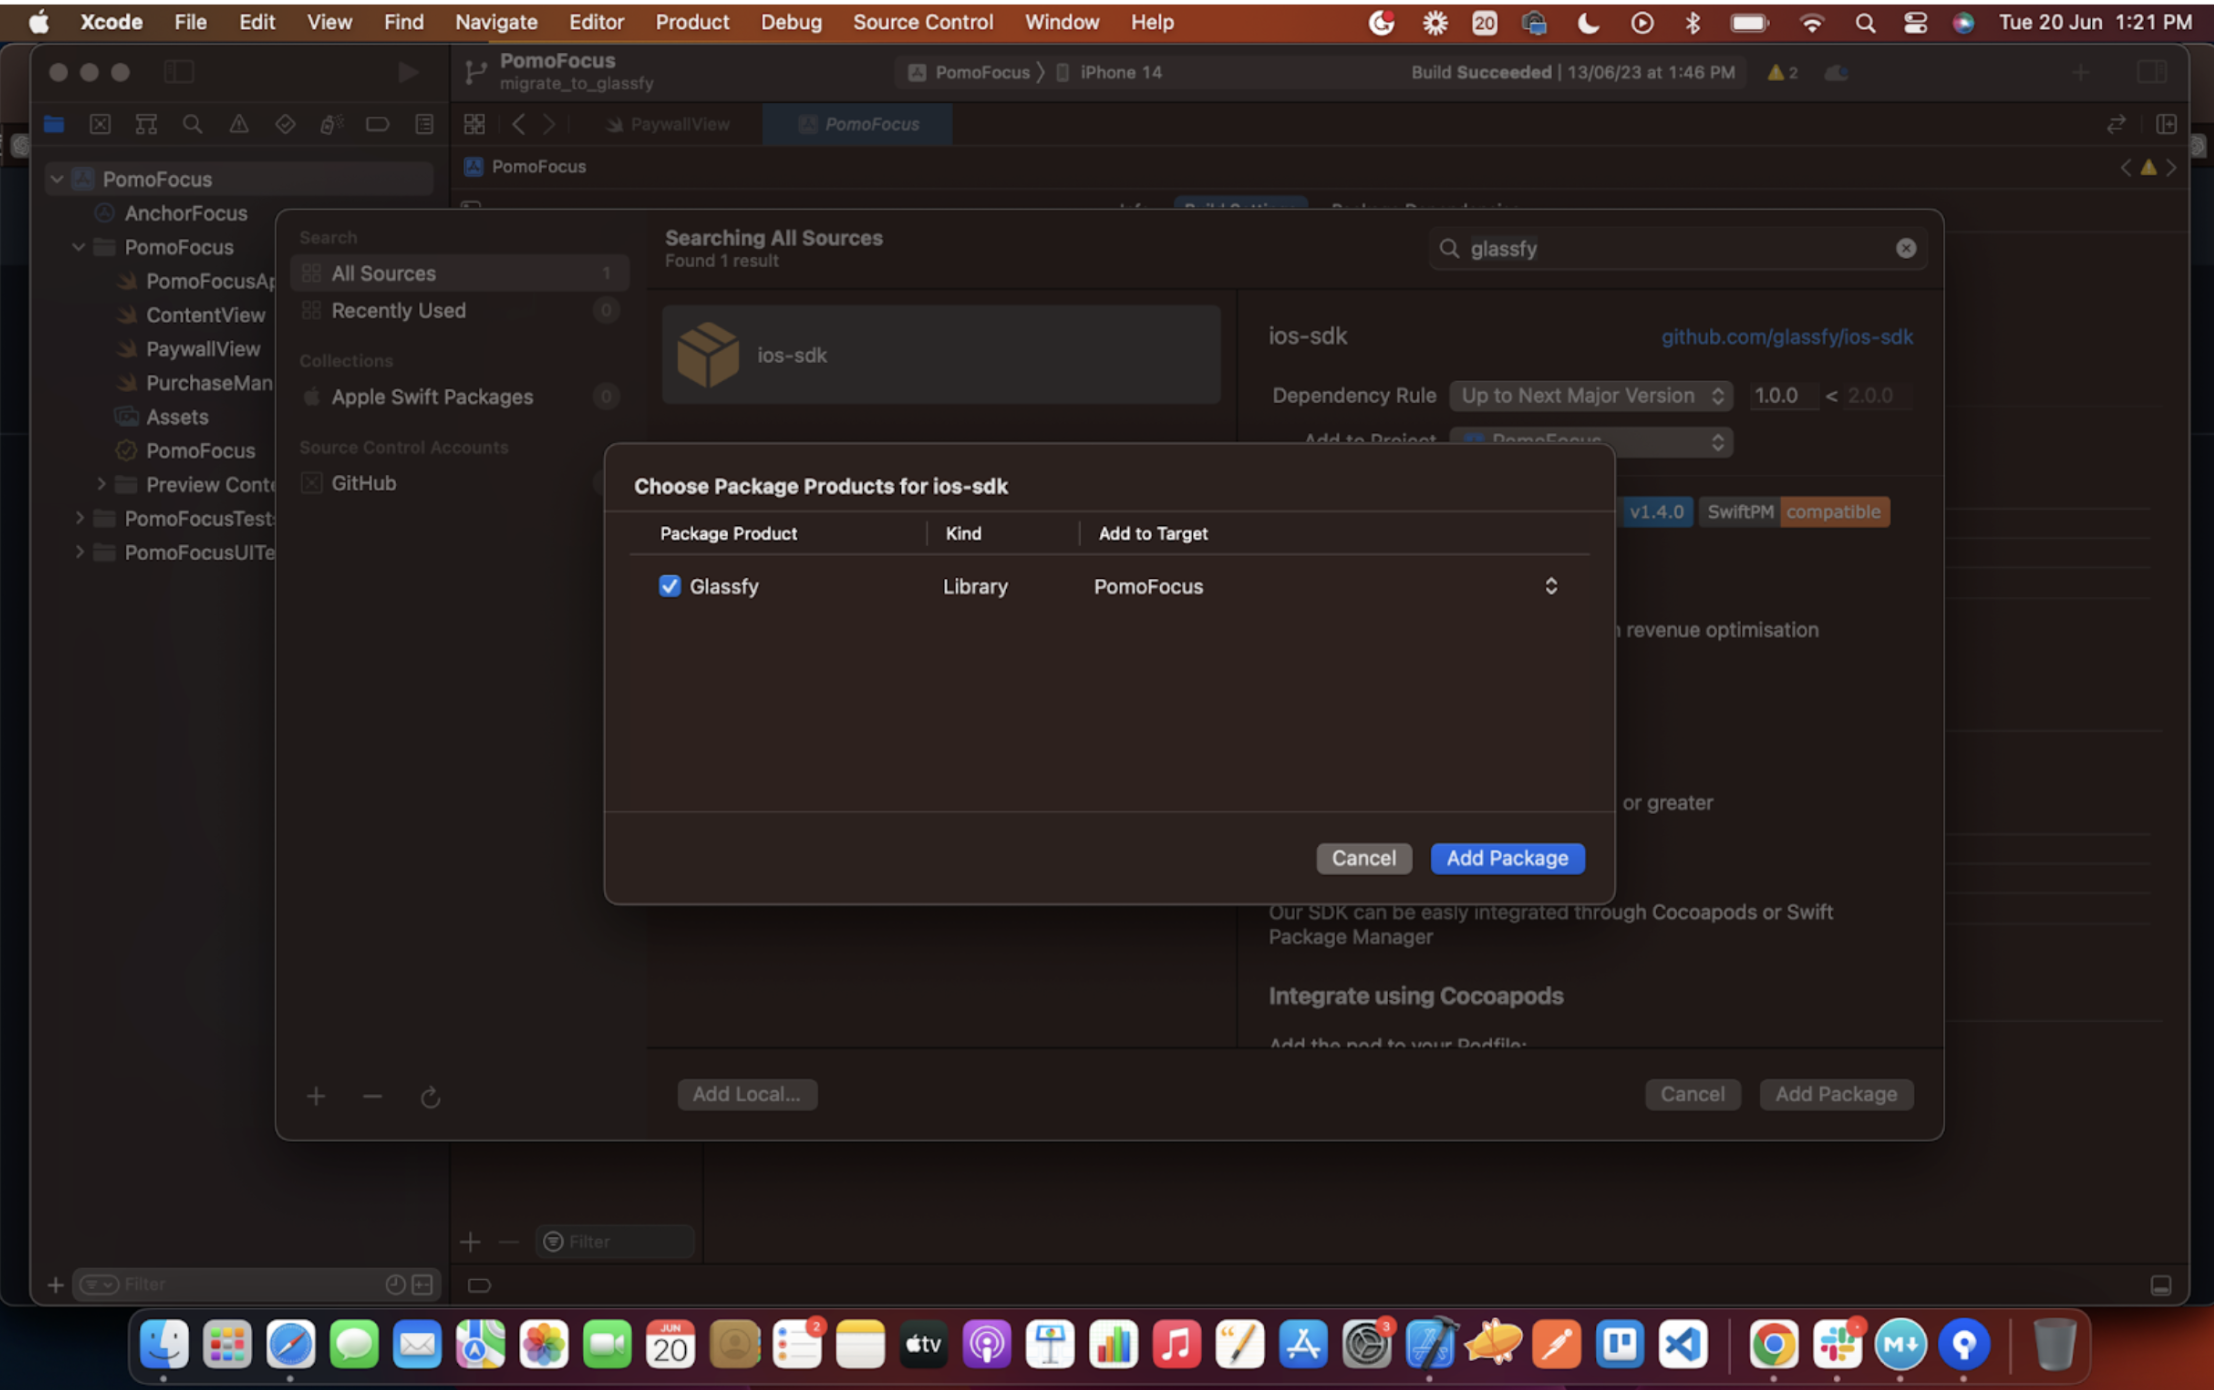
Step 1 : Create Account on Glassfy & Add Glassfy SPM
Log on to https://glassfy.io/ and create a free account using your Github credentials. Now add the SPM package of Glassfy SDK to your Xcode project.
Go to File → Add Packages → Search Glassfy or enter https://github.com/glassfy/ios-sdk → Add Package
Step 2 : App Bundle ID and Shared Secret
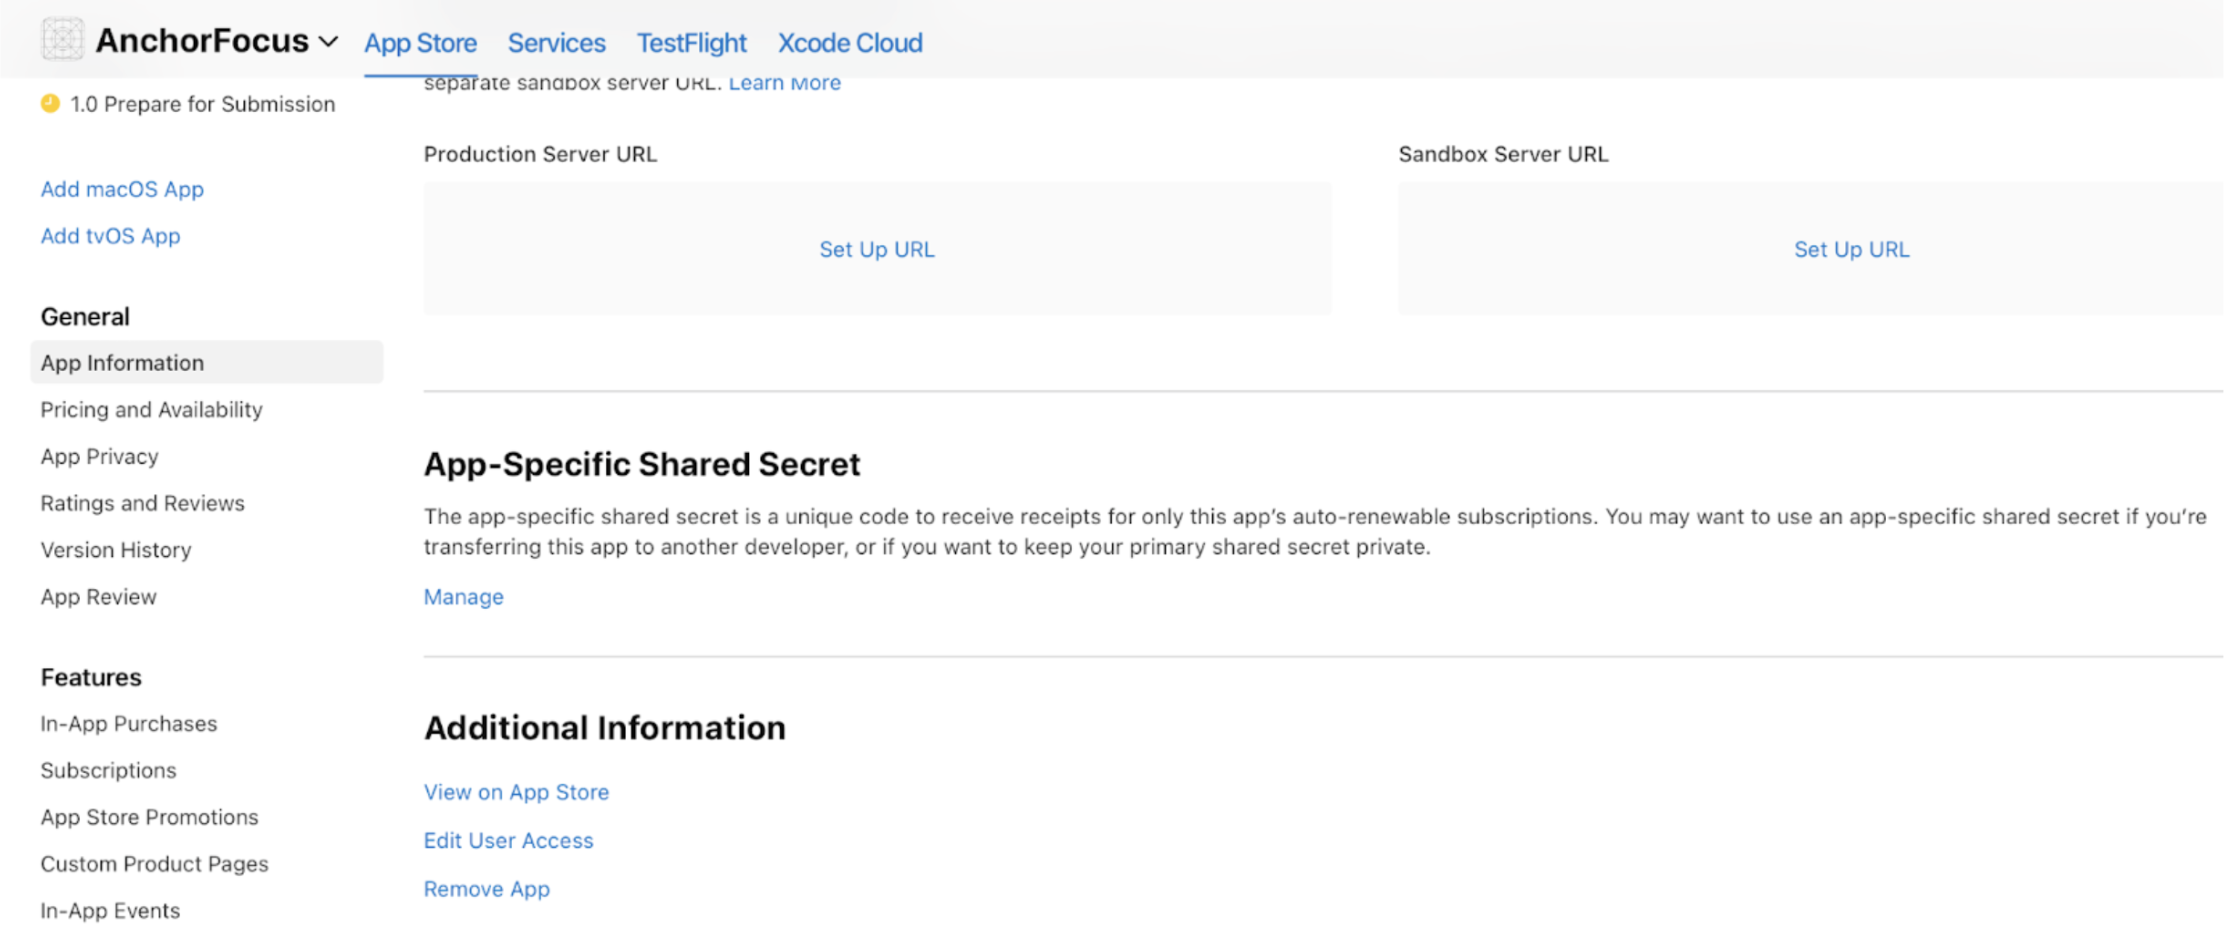
On the Glassfy Settings window, input your app Bundle ID and Shared App Secret. To find the Bundle ID, Go to Xcode --> Project 'Signing & Capabilities' --> Under the Signing section --> Bundle Identifier.
App Shared Secret is generated from the App Store Connect dashboard. Go to the App Information section on the left and you'll find the Manage button under 'App-Specific Shared Secret'. Click on generate and copy paste the secret key to Glassfy dashboard.
Step 3 : Create SKUs & Permissions
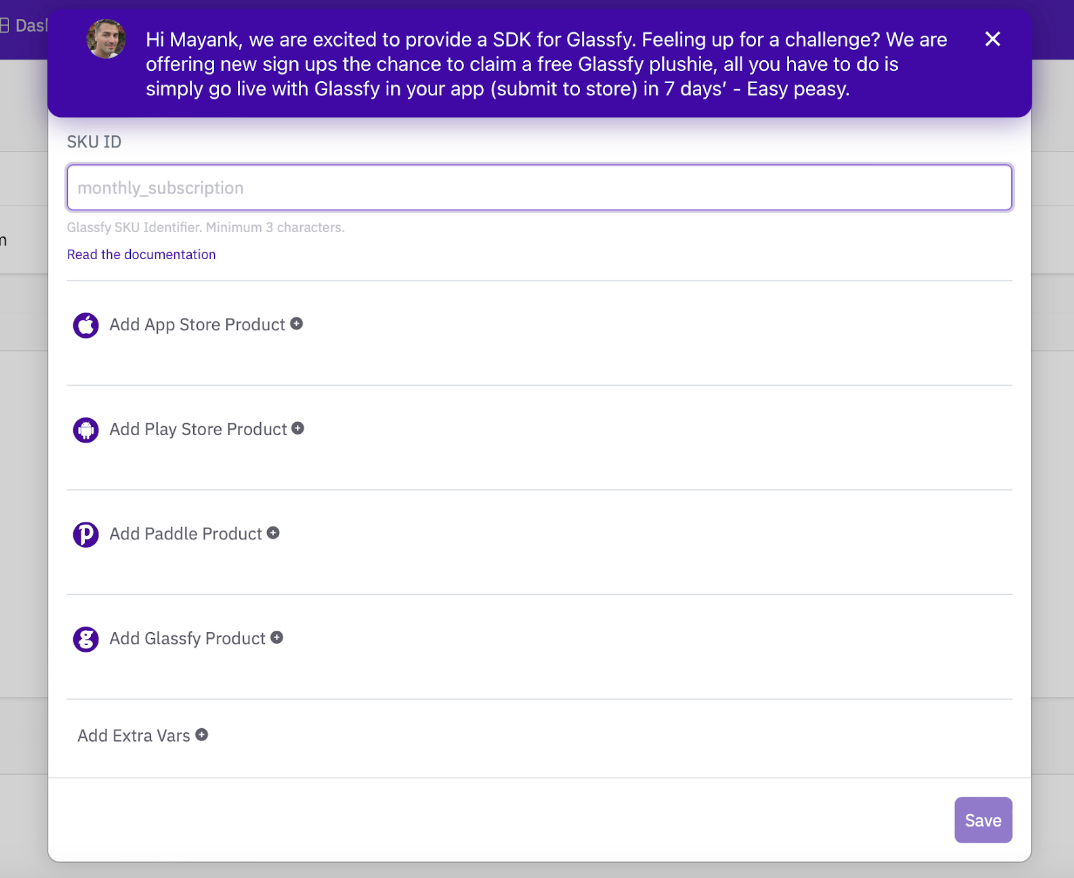
Now that you have performed all initial setup steps successfully, it's time to create products that you'll sell on your Paywall View to the customer. Go to Products section on Glassfy dashboard and create a new SKU.
Keep the identifier name of SKU relatable to the offer and short in characters. Select the 'Add App Store Product' option and choose Subscription from the type of Subscription model. Copy paste the App Store Product ID here from the App Store Connect subscription model we created in the last step. Next step is to create permissions for newly created SKUs. Name the Permission ID and input a description to it.
Step 4 : Create Offerings
Offerings is one of the powerful APIs of Glassfy SDK, it lets you fetch the all the SKUs that you have added under a newly created offering, without the need to hard code them in your Xcode project codebase. It allows you to dynamically fetch all the SKUs that you want to define under your created offering in a dynamic manner. Here are steps of how to create an offering in Glassfy developer dashboard.
Go to Products → Scroll down to offerings option → Click Create Offering Button → Input an identifier & description → Add Skus to the offering → Save
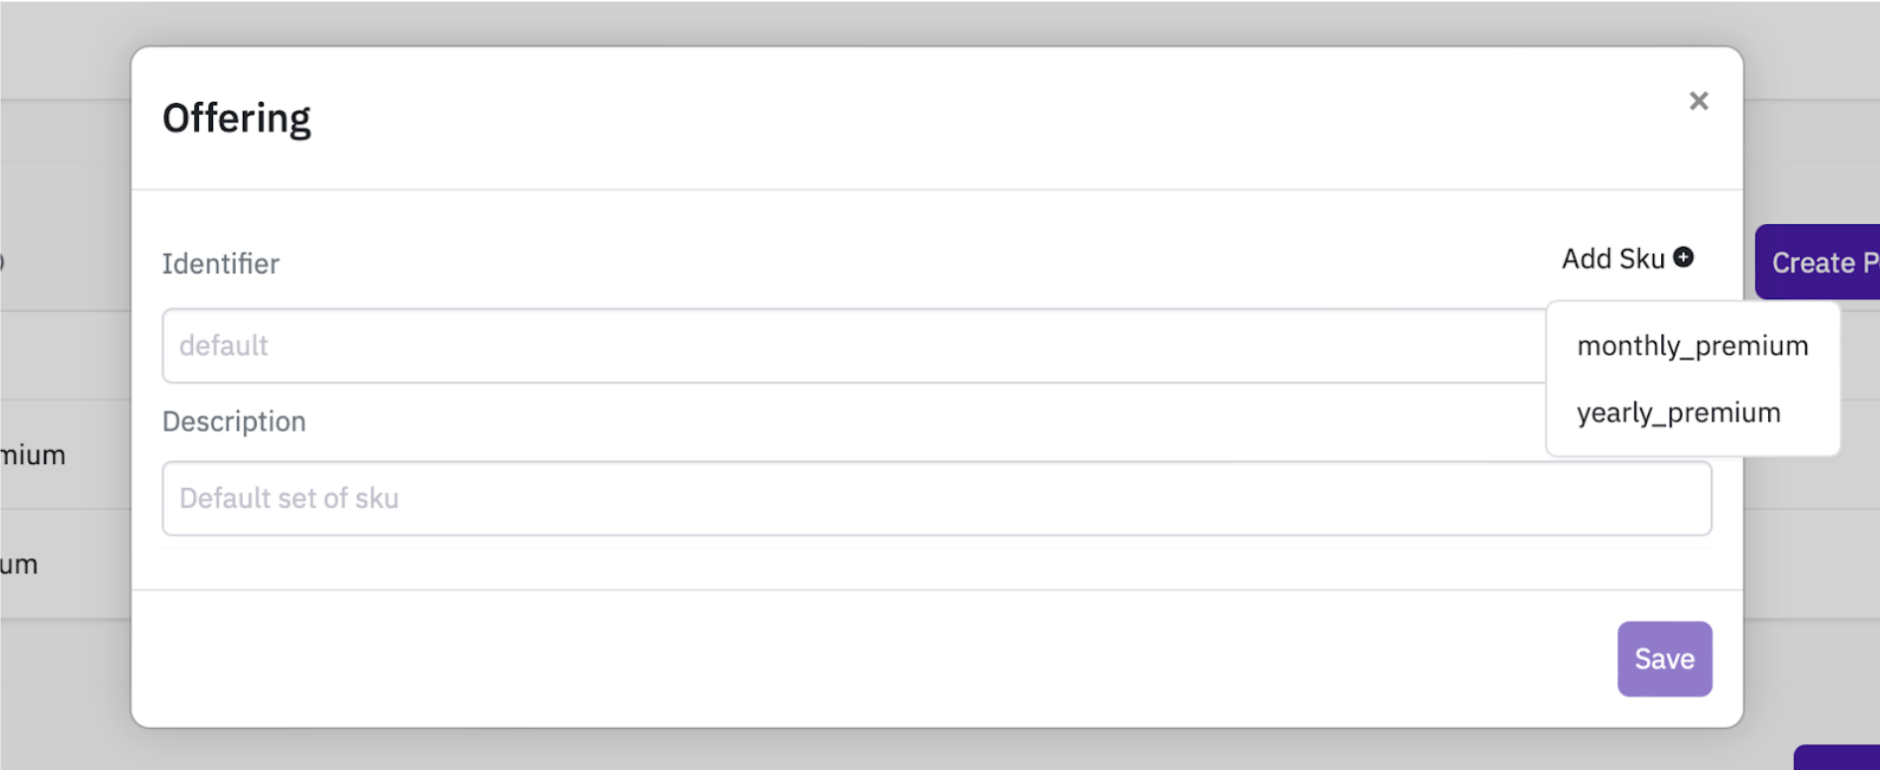
In this example, we named our offering premium and gave it a dummy description. Then, we added both the monthly and yearly premium Skus to the offering. The identifier of offering is required when you call the Glassfy.offerings() API in the Xcode project.

Step 5 : Implement Glassfy APIs
Final step is to start replacing the StoreKit APIs with Glassfy APIs in your codebase. Please find the completely migrated AnchorFocus App here for reference.
a. PurchaseManager will turn Singleton
import Glassfy

enum Premium: String, CaseIterable {
    case monthly_premium
    case yearly_premium

    var sku: String {
        return rawValue
    }
}

class PurchaseManager {

    static let shared = PurchaseManager()
    let apiKeyValue = "b9571f39bb7b42889ee0a9b27257f9a2"
    var products: [Glassfy.Sku] = []


    func configure() {
        Glassfy.initialize(apiKey: apiKeyValue, watcherMode: false)
    }
  }
In the above code snippet, we have first removed the StoreKit framework from imports and imported the Glassfy module, this will allow us to use all the open APIs of the Glassfy SDK in this swift file. We have created a new enum called Premium that contains two types of SKUs we have created on Glassfy developer dashboard.
The PurchaseManager will be modified to be a Singleton class and using the shared instance we will initialise Glassfy SDK. The initialisation method has two parameters apiKey and watcherMode. The apiKey can be found in the Settings Section on Glassfy App Dashboard. The WatherMode boolean lets you decide whether you want to keep StoreKit along with Glassfy SDK or completely migrate StoreKit to Glassfy SDK.
In this case, we'll set the watcherMode boolean to false since we will completely move from the StoreKit to Glassfy.
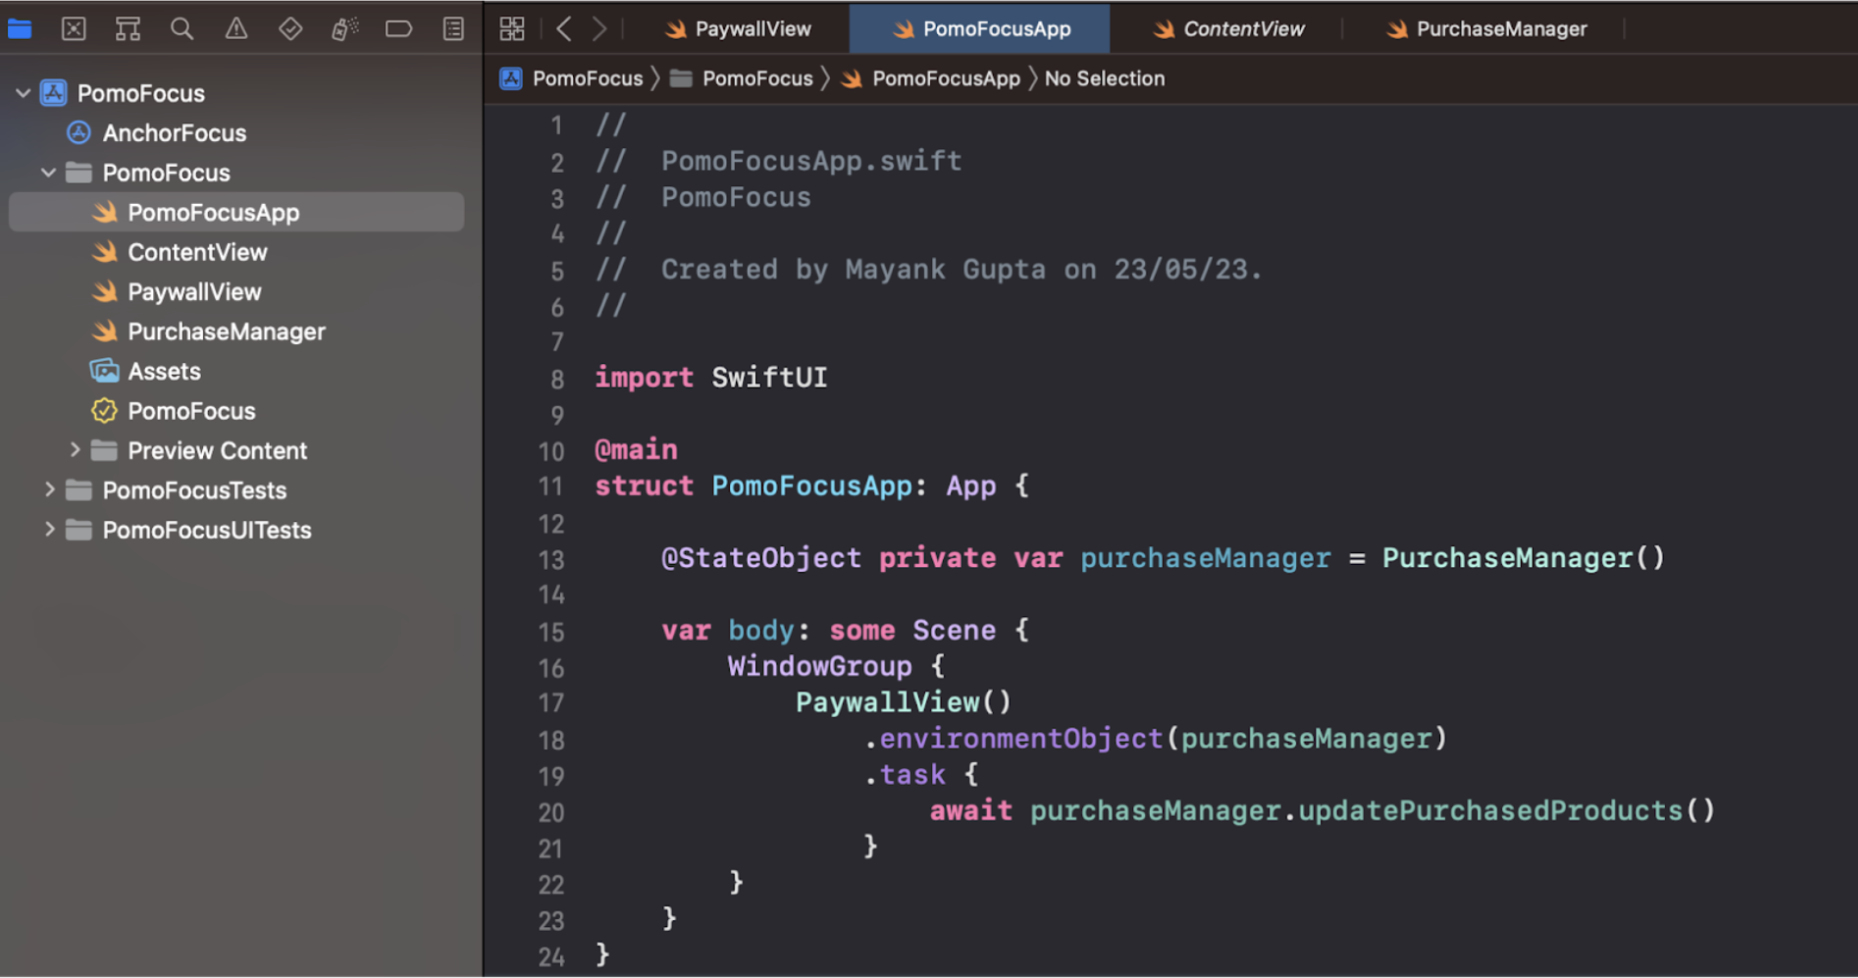
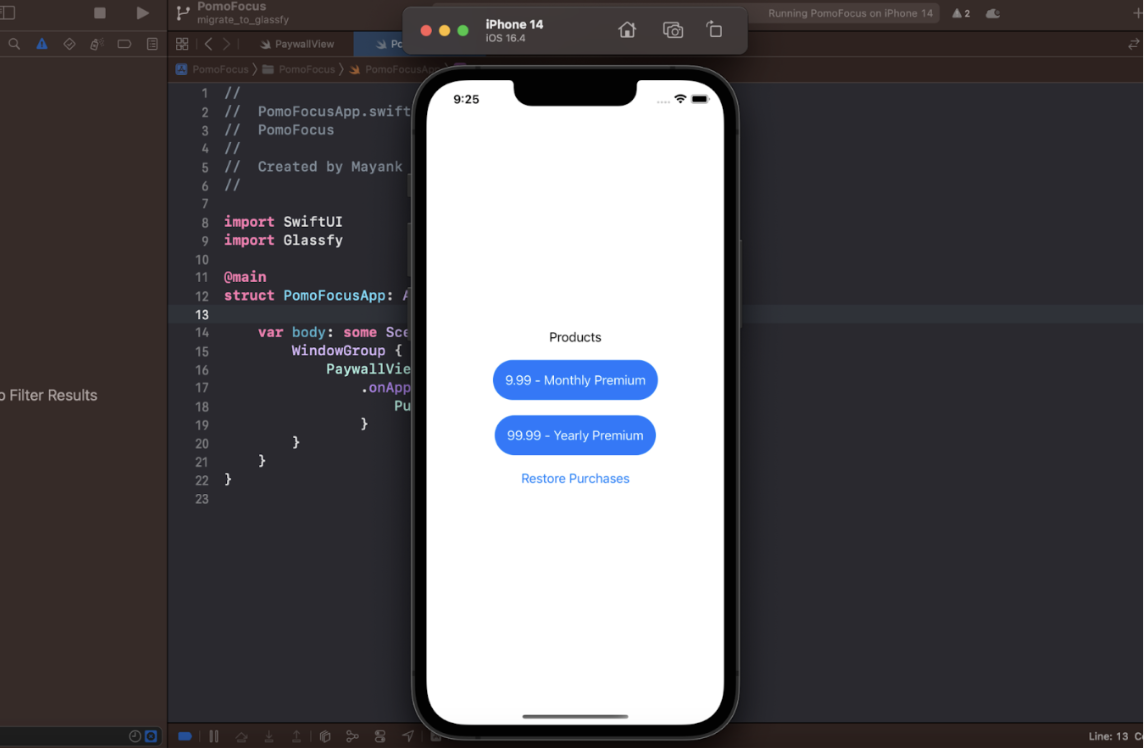
b. Call the SDK Initialisation on App Entry Point
import SwiftUI
import Glassfy

@main
struct PomoFocusApp: App {

    var body: some Scene {
        WindowGroup {
            PaywallView()
                .onAppear() {
                    PurchaseManager.shared.configure()
                }
        }
    }
}
In the above code snippet, we have imported Glassfy sdk and used the .onAppear() method that will allow us to call the initialisation of Glassfy sdk configure() method. Image of Glassfy Dashboard showing APIKey.
c. Fetch the Products using offerings()
    func getProduct() async -> [Glassfy.Sku]? {
        do {
            let offerings = try await Glassfy.offerings()
            if let offering = offerings["premium"] {
                // display your offering's skus
                for sku in offering.skus {
                    products.append(sku)
                }
            }
            return products
        } catch {
            print(error.localizedDescription)
            return nil

        }
    }
The Paywall View has to have products that can be offered to the end user, we'll fetch all the products using the offerings() method of Glassfy. In this case, we have made two products(SKUs), monthly_premium & yearly_premium and we added both of them to our newly created offering on the Glassfy Products dashboard named “premium”. We'll call the offerings API with the Identifier name premium to fetch both the items and use offering.skus to iterate over the skus array and append them in the products array of type SKUs.
d. Write the Purchase API
	func purchase(sku: Glassfy.Sku, plan: Premium) async -> Bool {
        do {
            let transaction = try await Glassfy.purchase(sku: sku)
            if transaction.permissions[plan.rawValue]?.isValid == true {
                return true
            } else {
                return false
            }
        } catch {
            print(error.localizedDescription)
            return false
        }
    }
Add the Purchase API call in PurchaseManger class, it has a parameter of type SKU, once the purchase() method is called we need to check if the permissions for specific sku we are purchasing holds true. If it's true, the transaction is successful.
e. Call the APIs on Paywall View
The Paywall View has three primary responsibilities :
- Showcase the offerings (products/sku).
- Restore Purchase action button.
- Redirect successful transactions to pro features.
We first imported Glassfy module to the file and created two @State variables, products and hasUnlockedPro boolean to keep track of when to transition the user from Paywall View to Premium feature view.
The method getProducts fetch all the SKUs and assign them to the variable products which we'll use to showcase the offerings. We'll iterate over the products and show them as a button. The action of these buttons use the method purchase from PurchaseManagerclass and assign a new value to hasUnlockedPro variable.
import Glassfy

struct PaywallView: View {

    @State private var products: [Glassfy.Sku] = []
    @State private var hasUnlockedPro: Bool = false

    var body: some View {
        VStack(spacing: 20) {
            if hasUnlockedPro {
                Text("Thank you for purchasing pro!")
            } else {
                Text("Products")
                ForEach(products, id: \.self) { sku in
                    Button {
                        Task {
                            if try await PurchaseManager.shared.purchase(sku: sku, plan: Premium(rawValue: sku.productId) ?? .monthly_premium) {
                                hasUnlockedPro = true
                            }
                        }
                    } label: {
                        Text("\(sku.product.price) - \(sku.product.localizedTitle)")
                            .foregroundColor(.white)
                            .padding()
                            .background(.blue)
                            .clipShape(Capsule())
                    }
                }
                Button {
                    Task {
                        do {
                            try await AppStore.sync()
                        } catch {
                            print(error)
                        }
                    }
                } label: {
                    Text("Restore Purchases")
                }
            }
        }.task {
            if let sku = await PurchaseManager.shared.getProduct() {
                products = PurchaseManager.shared.products
            }
        }
    }
}
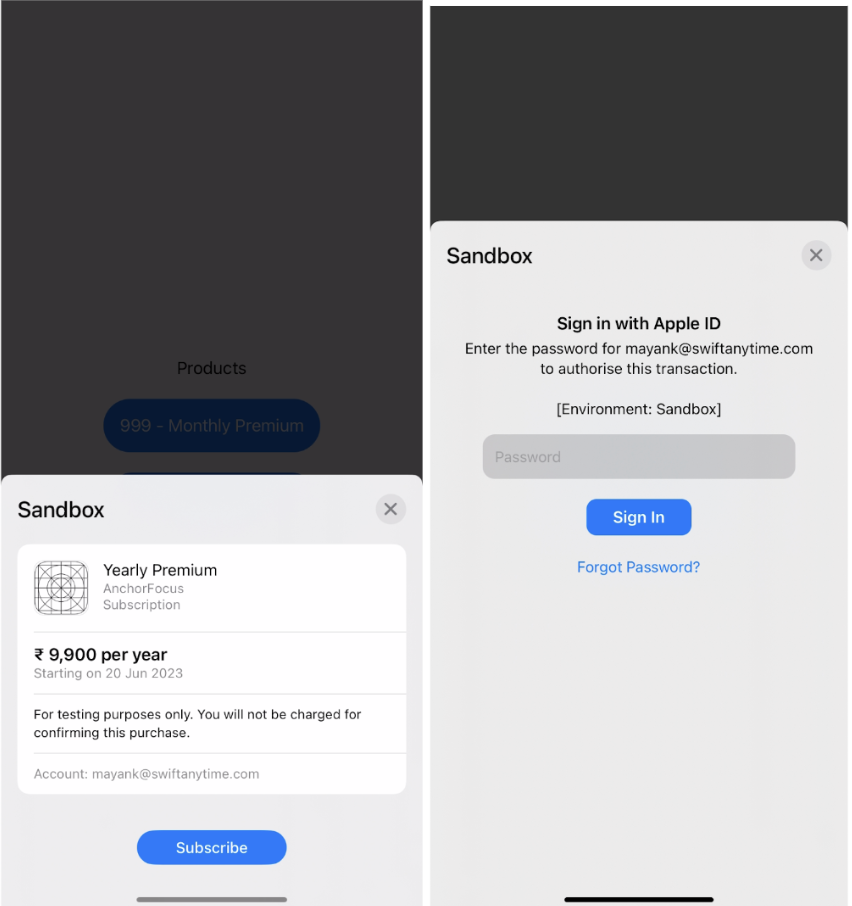
f. Test the Glassfy SDK implementation on Real Device
You can either use the Sandbox Account to test the final implementation or push your new build to TestFlight and test the purchase with a live environment. Find the Sandbox account transaction for a Yearly subscription down below.
What’s next?
Congratulations! You are now equipped with a comprehensive step-by-step guide to migrate from StoreKit to Glassfy SDK seamlessly. By embracing the enhanced features and flexibility of Glassfy, you can revolutionise your in-app purchases.
Sign up for the free plan and gain access to a wealth of features and functionalities that will empower you to make data-driven decisions, drive user engagement, and optimise your in-app purchase strategies.
With Glassfy's powerful Triggers, Glassfy functions, and insightful metrics like Churn Rate, Daily subscription, and Active Users, you have the tools to create personalised experiences, implement complex pricing models, and track key performance indicators.
Don't miss out on this opportunity to supercharge your in-app purchases. Take the first step by trying the free plan of Glassfy SDK today. Maximise your revenue, gain valuable insights, and propel your app to new heights of success. Get started with Glassfy now and unlock the true potential of your in-app purchases!
**StoreKit Implementation
Github Repo Link : https://github.com/iosmayank26/AnchorFocus
**Migration to Glassfy SDK Implementation
Github Repo Link : https://github.com/iosmayank26/AnchorFocus/tree/migrate_to_glassfy
Updated about 1 year ago